Search


Search
QUARTZ: COMPLETE INSPECTION OF PRODUCT
PRE-FABRICATION:
Any failure by a fabricator to comply with the recommended methods of manipulating the product may result in refusal of an end user claim. In order to protect your own interests, Quartz requires that you carefully read and follow these pre-fabrication, fabrication, and installation instructions.
Please direct any questions about the recommendations in this manual to your local Quartz official distributor.
Before manipulating any Quartz material, you must perform a visual inspection for defects and ensure any necessary color matching. As you would before cutting any material, we recommend you complete the following steps to help guide your inspection:
- Do not inspect slabs with the protective film on.
- Inspect both the front and the back of slabs for any defects.
- Look for any hairline cracks in the slab.
- ALL slabs should be checked for accurate color matching before fabrication, whether the layout calls for them to be seamed or unseamed.
- When book matching patterns, make sure that the main veins match/Line up 70 percent or more. Similarly, make sure that the third pair of veins match/Line up 50 percent or more. When book matching veins, make sure veins have a similar direction and a similar shape.
- Check slabs for correct dimensions, warpage, irregular spots, or other defects that make the slab unacceptable for fabrication.
- Check for accurate color matching of all Valiant Quartz colors, and the orientation/layout of pattern flow.
- Once the fabricator has deemed a slab to be acceptable for fabrication and the slab is cut or machined in anyway, the slab cannot be exchanged. The fabricator is responsible for determining if the slabs are fit for fabrication. If they are not, they should be exchanged with their supplier. Quartz will not accept claims for any of the above once the slab is modified or fabricated in any way.
Please note: Quartz will not accept any claims for any of the above if the slab is modified or fabricated in any way. You are responsible for determining if the slabs are fit for fabrication. If they are not, they should be exchanged with your
FABRICATION GUIDE: RECOMMENDATIONS FOR SLAB STORAGE IN FABRICATION SHOPS
A-FRAMES:
The best way to store Quartz slabs that are ready for fabrication or to be shipped to a job site is on an A-frame that is constructed of wood or metal. It is best that A-frame carts come with forklift receivers for loading and transportation. Slabs must always be stored indoors.
• Double A-frames should have the same number of slabs on each side for proper balance and afety.
• Large double A-frame carts are usually 8′ long by 43″ wide with a height of 60″. The manufacturer-recommended capacity for large double A-frames is 4,4000 lbs (2,200 lbs per side).
• Small double A-frame carts are usually 6′ long by 43″ wide with a load height of 48″. The manufacturer-recommended capacity for small double A-frames is 4,400 lbs (2,200 lbs per side).
• Single-sided A-frames can also be used (these are great for box vans). The manufacturer recommended capacity for single-sided A-frames is 2,200 lbs. Make sure that material is always strapped to an A-frame.
• For double A-frames when more than one slab is stored on each side, slabs should be kept flat without any gaps to prevent warping Make sure to strap slabs to the A-frame to prevent warping or flexing.
• Slabs should always be placed face to face and/or back-to-back to help prevent damage to the polished side of the slab.
• Quartz should always be safely secured to an A-frame with straps whenever transported. Never attempt to move Quartz on an A-frame if material is not banded or strapped. This applies to transportation in the fabrication shops and to transportation on trucks/vans.
• A-frames are acceptable for temporary storage but never for long-term storage.
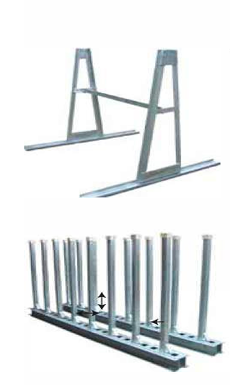
VERTICAL STORAGE RACKS FOR SLABS:
Vertical storage racks are recommended when slabs require long-term storage to ensure the safety and reliability of the material. Vertical storage racks should be capacity rated, constructed of steel, and designed for quartz slab storage. Slabs must always be stored indoors.
• Slab storage rack system generally come in 5’and 10′ sections with 2″ by 2″ uprights (poles). Rubber- tipped uprights are also recommended. Some of these racking systems can be purchased as interlocking sets.
• Racks that are 5′ usually come with eight (8) square uprights. The capacity varies basedon the manufacturer, but a good rule of thumb for this racking system is for internally reinforced uprights (poles) to accommodate 6,800-9,000 lbs between the uprights (sets of poles), and to accommodate a 3,200 – 4,400 lbs load on each upright
• Racks that are 10′ usually come with 16 square uprights The capacity varies based on the manufacturer, but a good rule of thumb for this racking system is for internally reinforced uprights (poles) to accommodate 23,700 lbs between the uprights or (sets of poles), and to accommodate an 11,800 lbs load on each upright
• Keep in mind the weights or loads on the racking systems can varyby manufacturer. The numbers used in this fabrication guide are based on heavy-duty racking systems that provide high standards of safety.
• Slabs should always be placed face to face and/or back-to-back to prevent damage to the polished side of the slab.
• All slabs stored on these long-term storage racks should be covered with Quartz protective plastic to avoid damage.
• The vertical slab storage racking system is for long-term storage of Quartz.
PROPER MATERIAL HANDLING OF QUARTZ:
• Never transport Quartz horizontally.
• Horizontal storage of Quartz adds stress to the material and causes hairline cracks that could lead to breakage.
• Heavy-duty carts/dollies should be used when moving material around your fabrication shop.
• Heavy-duty slab booms and slab-carry clamps should be used to move material around your shop when using an overhead crane or fork truck.
• All cutouts should be supported with 2″ x 4″ x 8″ support rails when transported for installation.
• Pneumatic vacuum suction cups can also be used to move slabs and finish material throughout the fabrication shop.
• We recommend that all suction cups be used with white rubber to prevent dark rings from appearing on the white translucent quartz.
The following tools are a minimum requirement for a professional fabricator to have on hand to fabricate Quartz. These tools can be purchased from a variety of suppliers in the United States.
BASIC DIAMOND TOOLING & ASSOCIATED POWER TOOLS:
• Diamond polishing pads (wet pads only). Preferred grits forfabrication are 50, 100, 200, 400, 800, 1500, 3000.
• Diamond cup wheels
• Diamond core bits
• Diamond contour blades (manual sink cutouts)
• Diamond turbo quartz blades (5″ and 6″ sizes)
• Diamond router bits (edge detail)
• Diamond bridge saw blades (Size will vary based on the horsepower of your bridge saw)
• Silicon carbide grinding wheels (less expensive than diamond cup wheels)
• Back-up pads, rigid and flexible (holder for polishing pads with 5/8-11 threads for polisher and grinder)
• Pneumatic polisher (0 – 4,000 rpm)
• Electric grinder/polisher (variable speed of 2,800 – 11,000 rpm preferred)
• Water supply units for grinder and polisher if not supplied with unit.
ADDITIONAL RECOMMENDED FABRICATION EQUIPMENT:
• Bridge saw with horsepower of 20 or higher.
• Automatic edge profiler
• Computer numerical control (CNC) machine
• Waterjet
• Handheld edge profiling machine
• Fork truck
• Overhead crane
• Fabrication tables
• Air compressor
• Water supply source
• Stone carts/dollies
• A-frames/storage racks
• Slab clamps
BASIC SAFETY EQUIPMENT:
Quartz stone dust contains silica, which can be a serious health hazard if inhaled. Quartz should always be cut and polished with wet diamond tooling and proper ventilation throughout the shop and offices. Fabricator should always use approved dust masks, and eye, ear and foot protection when fabricating Quartz.
The following list are basic safety equipment options.
• Safety first-aid kit
• Dust masks/respirator (indoor and silica rated)
• Safety glasses
• Solvent-resistant gloves
• Ear plugs
• Waterproof, steel-toe boots.
• Waterproof apron or rain suit
• Leather gloves (recommended for moving sharp slabs)
• Ground Fault Interrupter (GFI) for electric tools in a wet environment.
STANDARD SAFETY PRACTICES AND PROCEDURES FOR FABRICATORS
1. Always wear protective clothing. Severe injury can occur if safety precautions are not followed in the fabrication shop or on the job site.
2. Fabricators should follow all safety instructions and warnings on all material safety data sheets (MSDS) for all products used in the shop.
3. Read and follow all manufacturers’ safety guidelines for all power tools and fabrication equipment used in the shop.
4. It is recommended that steel-toed safety boots be worn during the fabrication process, when handling or moving quartz products, and during installation at a job site.
5. Fabricators should always use eye protection. All fabricators should use Occupational Safety and Health Administration (OSHA)-approved eye protection. Failure to use eye protection can result in severe injury.
6. Fabricators should always use hearing protection when working with machinery and power tools. OSHA limits safe sound exposure to 85 decibels during an eight-hour period. Check with the manufacturers of all your equipment and power tools and adjust hearing protection accordingly. There are outside companies that can evaluate the noise levels in your fabrication shop and suggest proper ear protection.
7. Because Quartz recommends that our material be fabricated when wet, fabrication can create the potential for slip hazards. Floors should be sloped to trench drains, and all water should be drained away from the work area. Additionally:
A) All trench drains should be cleaned regularly of stone slurry to ensure good drainage for water flow.
B) Work area floor should be squeegeed several times a day to eliminate standing water.
C) Fabricators using electrical tools should make sure they are using aground. fault interceptor (GFI) and keep away from standing water Fabrication shops should invest in cord drops from the ceiling as an electrical solution.
D) Pneumatic tools (those powered bycompressedair) are always recommended.
8. Check your state’s OSHA guidelines to better understand all proper safety protocol.
DIGITAL TEMPLATING:
Today there are many digital templating methods from which to choose. Digital templating is used to capture accurate countertop dimentions and configuration data . Digital templating has the advantage of being able to send/relay the digital information directly to compatible fabrication equipment, such as computer numerical control (CNC) machines, bridge saws and water jets. These digital systems use lasers, digital cameras, and point-to-point digitizers. Digital templating technology is a faster, more accurate and efficient way to measure Jobs because information can be transferred digitally to your fabrication equipment.
MANUAL TEMPLATING:
Handmade fabrication templates are created to accurately transfer the measurements and configurations from the job site to the fabrication shop. The most common items used are thin plywood, luan strips a n d cardboard. Job drawings containing the specific job information and are particularly important to support the actual template. It is important to capture all necessary information to accurately fabricate all aspects of the job, including sink and appliance center lines, faucet hole locations, finished edges and overhands. It is recommended that all appliances, sinks, cooktops, or any item that requires a cutout on the countertop be on site when the job is templated.
INFORMATION TO GATHER FROM HOMEOWNER:
• Choice of 2cm or 3cm material
• Name of slab selection
• Determine seam locations if needed
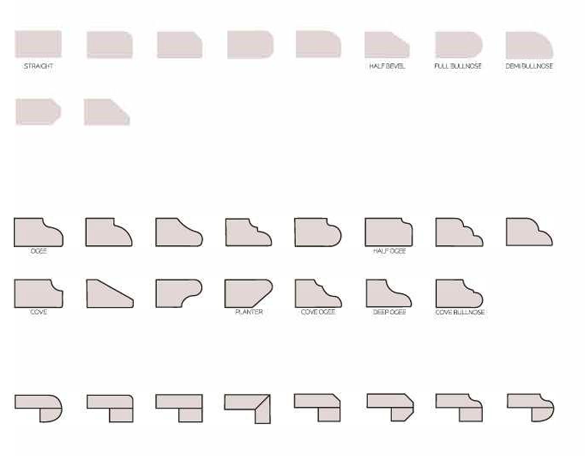
• Edgeprofile
• Backsplash
• Sink location
• Faucet location
• Appliance locations (ie. cooktop/range, refrigerator, dishwasher)
• Location of additional items (ie. soap dispenser, sprayer)
• Clarify inside corners (if using one piece of material for countertop, then use a 3/8-inch core bit for corners as internal corners must have 3/8″ radius at minimum; if using two pieces of material, use a square two-piece seam)
Especially important regarding cabinets:
Make sure that the cabinets are finished and installed properly. Fabricator must verify that all cabinets are level. The top of the cabinets must be true and flat with no more than a 1/16″ slope
over the span of 18″. The cabinets must be adjoined to each other and secured to the immediate wall. All cutouts and seams must be properly supported; similarly, there should be extra structural support around the dishwasher.
SUPPORT REQUIREMENTS
Structures with support on four (4) sides. Structures supported on four sides do not require any additional support for either 2 cm or 3 cm material if the countertop depth is less than 26″ and the countertop length is less than 118″.
However, if the above dimensions are exceeded, support will be required every 36″.
Structures with support on three (3) sides (i.e., dishwashers, frameless cabinets, desks, and Lazy Susans). Structures which are supported on three sides require additional support. Guidelines for 2 cm and 3 cm material are as follows:
• 2 cm & 3 cm materials with countertop depths greater than 26″ need support every 24″.
• 2 cm material with countertop depth Less than 26″ needs support every 24″.
• 3 cm material with countertop depth Less than 26″ needs support every 36″.
Some suggested support materials for cabinets that need additional support for Quartz:
Plywood, wood, MDF board, structural steel. ALL non-moisture resistant materials or products are not acceptable for use as support material. (OSB, Particle Board, etc.)
All of the above information should be taken into consideration by the fabricator during the templating and layout/measuring procedure. This will help avoid problems during the fabrication and installation process. Not following the procedures in this fabrication guide will void any warranty given by Quartz.
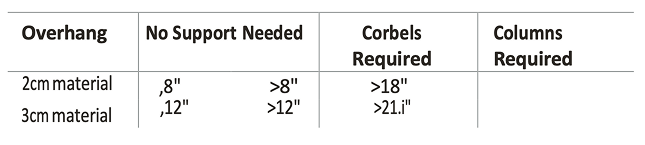
OVERHANG/CANTILEVER REQUIREMENTS:
• Overhangs cannot exceed 1/3 of the countertop depth and must have a minimum length of 24″.
• Material that is 2 cm requires support every 24”.
• Material that is 3 cm requires support every 36″.
• Overhang ratios require that two-thirds of the width/length of the material to be used be supported; one-third of the width/length of the material to be used can be unsupported (anoverhang).
• No cutouts or cored holes are permitted on any overhangs.
• Additional support (ie. support bars or 3/4″ (plywood) may need to be added to meet additional span requirements.
• Overhangs that exceed cantilever rules will need to add columns, corbels, or legs to be properly supported as follows.
• Corbels should always be mounted to a stud for proper support of the material.
RECOMMENDED SUPPORT MATERIAL FOR CABINETS:
• Plywood, wood, medium density fiberboard and structural steel are the recommended support materials for cabinets that need additional support for Quartz.
• Materials or products that are not moisture resistant, like oriented strand board and particle board, are not acceptable as support material.
The above information should be taken into consideration during the templating and layout/measuring process. This will help to prevent any problems during the fabrication and installation process. Not following the procedures in this fabrication guide voids any warranty provided by Quartz.
1. LAYOUT:
Before cutting Quartz slabs, calculate the square footage, length, and width of material that will be needed to complete the project. This is particularly important when using Quartz because each batch and slab are unique and have specific shades that need to be used for each job. Inaccurate measurements may create match concerns, and more material may need to be ordered. It is important to thoroughly inspect the slab for color, pattern, and defects. Do not use material with visible manufacturing defects unless the layout/job allows you to work around them.
2. DETERMINE SEAM LOCATIONS:
During the layout process, determine all your seam locations. This is particularly important to ensure the optimum aesthetics of the material and the kitchen. Seams should never be placed in the following locations:
• Through the center of sink cutout.
• In places where there is direct sunlight
• Above dishwashers located the under the counter.
3. PROPER VEINING/COLOR MATCHING:
• Always inspect all material before fabrication. Quartz replicates marble as it is a veined material that has a non-directional pattern. During the layout process, it is particularly important to use extra care with respect to your seam locations. Whether the material has a factory edge or a fabricated edge, the Quartz vein distribution can be different throughout the slabs. Our veined patterns will require a more careful specialized layout to provide the customer with a rich, aesthetic look.
• Color matching slabs before fabrication is particularly important as it is very normal for quartz slabs to have slight color variations between batches production cycles due to the complex blending of natural minerals and raw materials.
• If your job requires more than one slab, be sure to check the Quartz label for the batch number and the shade number of the slabs. After inspecting all slab numbers, it is important to remove the protective plastic film to visually inspect slabs for color variation, color matching, and any defects before cutting material.
• During the layout process, remember to color match backsplashes as they must color match and have a similar vein pattern to the countertop.
• The layout process is a critical one in the fabrication of Quartz as it directly impacts the beauty of the final product that is produced. A little extra attention during the layout process really showcases the beauty of Quartz and can create endless beauty for the homeowner.
4. PROPER CUTTING:
• All equipment that is used to cut Quartz should always be kept cool with a sufficient amount of water. ALWAYS AVOID EXCESSIVE HEAT WITH ALL DIAMOND-CUTTING TOOLS.
• The first cut of your Quartz slab should be made along the largest part of the slab and then proceed to the shortest.
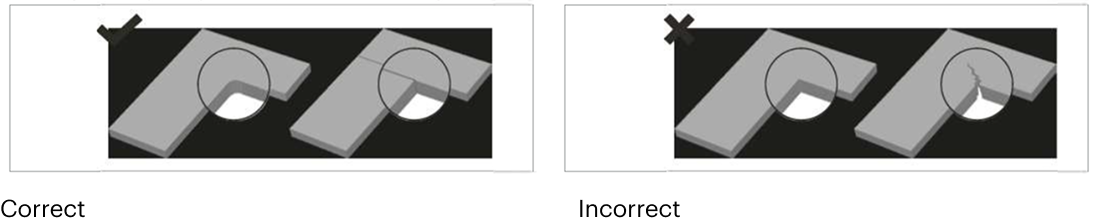
• Important. Never cut square corners when fabricating Quartz. This can create stress points in the countertop and can result in cracking. ALWAYS USE A DIAMOND CORE BIT FOR ALL CORNERS OR RADIUSES.
• Inside corners that are fabricated on a single slab must have a minimum of a 3/8″ radius.
• Cross cutting a slab is strongly prohibited when following the cut sequence. Cross cutting will create vibrations and tension thus a crack could occur. Finish all cuts completely while using the recommended cut sequence. Always use a diamond core bit to create a radius. Please clarify: This should always be used on inside corners, so any internal angled corner must have a radius. NEVER CROSS CUT!
• Remember that quartz slabs contain resin, which can cause warping or bowing depending on the weather and how it is stored. If warping or bowing does exist in the slab, the double-cutting technique should be used. First, cut the slab to half its thickness to relieve the tension and flatten out the slab. Then, proceed with the second cutting pass to finish the cut.
5. CUTOUTS:
This can be completed with several distinct types of equipment. A bridge saw can be used for straight cuts, but a radius needs to be cored with diamond core bits with no cross cutting. The same rules apply to CNC machines, which are also extremely popular. A water jet can also be used with proper abrasives and water pressure.
• L- or u-shaped countertops with inside corners should always be fabricated from a single slab and must have a minimum of a 3/8″radius. Always keep in mind that the larger the radius, the stronger the corner.
• If the distance between the cutout and the seam is Less than 6″, the seam needs to be supported. This can be achieved during the layout process by making sure that all seams are at a cross member of the base cabinet; otherwise, additional cross members need to be added.
• Internal cutouts on all corners should have a 3/8″ radius atminimum.
• Cutouts for all drop-in sinks, cooktops, outlets, slide-in stoves, etc. should include an extra 1/8″ from the edge to allow for expansion.
• Cutouts range from simple, core holes for faucets and soap dispensers to complex cutouts for specialized equipment. It is best to have all equipment on the job site during the installation process as this is the safest way to determine the shape and size of the core or cutout.
• Always refer to the manufacturer’s recommendations when available.
• The customer should make the final decision regarding the location and the size of the cutout in their countertop and sign off on this.
• Additional support should be added to both ends of the cutout if the base cabinet cross bars are not within 3″ of cutout.
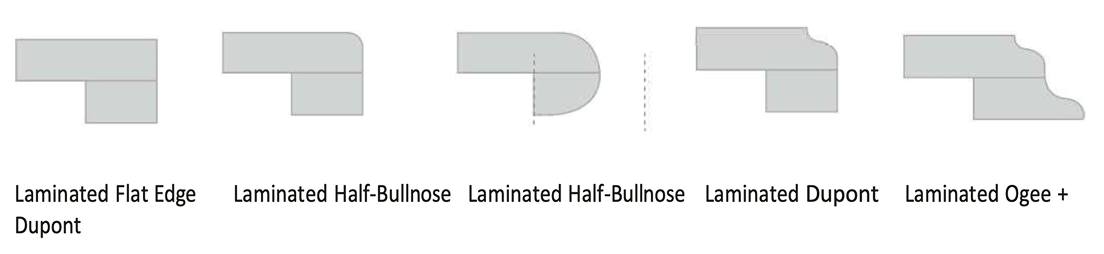
6. LAMINATIONS:
Laminate edge refers to the process of gluing pieces of stone together to create a variety of edge profiles, including mitered edges, stacked edges and drop edges. The lamination process is also used to create more sophisticated edge profiles.
Stacked Edges: An additional 1.5″ wide strip of material is cut during fabrication from the same slab. The piece is glued to the underside of the countertop along the front edge to create a thicker edge. Example: If you are using 2cm of material it will create a 4cm or 1.5″ edge. If a plywood substrate is required underneath your 2cm countertop for support the laminated stacked edge also serves to hide the plywood from sight This process can also be done with 3cm material.
Examples of Lamination (stacked edges):
Tip:
When laminating, it is important to make sure that the lamination piece is the full length of the top piece and that the corners are cut at 45 degrees. If for some reason the two laminated be joined, the joint must be cut at pieces must a 45-degree angle. The use of a mitered end cut reduces stress on the material that may cause stress fractures.
The lamination strip should be cut from the same slab as the countertop surface material to ensure a color match. When cutting the piece to be lamina-ted, add the lamination piece size to your cutting measurements to ensure that a lamination strip of the correct length and color is available for the lamination process. A 45-degree corner joint is recommended to minimize the stress on the corners.
• Use full-length lamination pieces if possible.
• For long countertop runs where a joint may be required, make sure that the joint in the laminated piece is at 45 degrees to minimize stress points.
• Proper clamping is recommended every 3″-4″ for a secure, tight bond.
Examples of Mitered and Butt Joints:
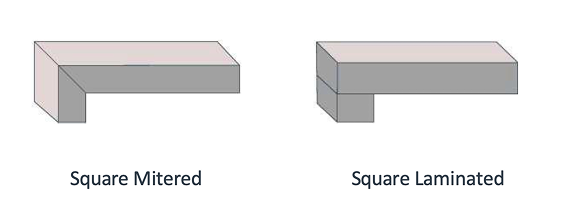
Mitered Edge:
A mitered edge is one with a perfect, 90-degree angle This is created by joining two pieces of Quartz each with a 45-degree angle. This is typically done with 2cm material. The larger the apron, the harder it is to hide the seams because it is more difficult to clamp. It is never recommended to have a mitered edge over 4″ unless a special support is added.
Adhesives:
We recommend that a cartridge-style acrylic or epoxy that is already color matched for Quartz be used. Quartz is translucent, so solid colors will not match the translucency of the stone. Acrylics and epoxies have a chemical attraction to the stone and will provide the tightest seams. This is particularly important for mitered edge details because, when property done, the adhesive is not visible.
7. POLISHING/EDGE DETAIL:
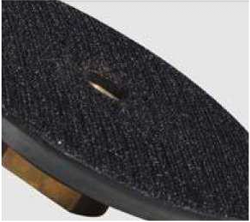
Polishing: It is especially important to select the right polishing pads for Quartz. Please note: Do not use polishing pads that have colored resin. While such pads can work well with granite, they require an excessive amount of water and can transfer the resin’s color to the edges of Quartz. We recommend using only white resin pads for all. applications, whether hand polishing, or using an automatic edge polisher or a CNC machine.
1. Rigid Backer Pads: Flexible backers work well for concave profile edges, such as ogee edges. The need to use a flexible backeron most other profiles is not needed. Keep in mind automatic edge machines. all use extremely rigid polishing tools and backer pads; these machines will produce a far better edge than what many fabricators can do by hand.
2. Polishing Pads: Common problems include both using too much water and not enough water and not using the proper polishing technique. The Sequence of grits shown above for both Polished and Hone finishes are a guideline for achieving a polish equal to the factory finish.
• When too much water is used while applying pressure to the center of the pad, the water gets trapped in between the pad and the stone, causing a hydroplaning effect This causes the water to escape to the outer edges of the pad, making it difficult for the polishing pad to effectively polish the edge or edge’s surface. This will result in a spotty polish
• When too little water is used, the polishing pads tend to flex or cup outwards around the center of the pad (mainly with higher grits). This causes the outer edges of the polishing pad to touch the surface but will not allow the center of pad to polish. The tendency is to apply more pressure, which also leaves a spotty polish.
• When polishing the edge detail on Quartz, be sure to use the entire polishing pad surface, which is stated in the tips below. When polishing any bullnose edge, it is important to use the center of the pad only as it will give the proper water distribution for the pad and the stone.
• Never use a final buffing pad for Quartz These come in black and buff and contain different chemicals and no diamonds and are meant to bring granite to a high polish. The last step for polishing Quartz is to use a grit level of 3000.
• Dry polishing the edge profile may cause overheating of Quartz. Excessive heat to the stone can alter the physical properties of the slab which can cause micro-fissures not visible to the naked eye. This can lead to chipping, discoloration, and a p=r, uneven polish. Never use dry polishing pads on Quartz.
• Quartz should never be polished on the top surface of the manufacturing finish.
Polishing Tips: When polishing any edge detail on Quartz you should use the proper amount of water. Polishing pads with grit levels of 50-400 have a higher concentration of diamonds and require less water; a trickle from your center water feed will be sufficient Higher 800-1,500 grit pads have less diamond content and require more water. Using the proper water flow allows the pads to work faster.
Polishing should be done in circular motion, utilizing the edges of the polishing pad as it rotates from the top half of the edge to the bottom half as it moves down the piece. While polishing, you will feel resistance with each grit level, which is the diamonds polishing. Allowing the diamonds to do the work requires less pressure from the polisher When resistance isno longerfelt, itis time to change the polishing pad to the next grit Follow this procedure until you arrive at the final grit level.
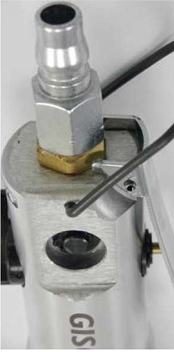
3. Air/Electric Polisher RPM: The rpm for all air/electric polishers should be between 2,800- 4,000. It is best to start at 2,800 rpm and increase as needed. Anything over 4,000 rpm could result in burning or smearing the resin on your edge detail. This is where the color of the resin on the polishing pad makes a significant difference. If the edge is burned with a white resin polishing pad, it can be easily removed with denatured alcohol. However, the dye in colored resin polishing pads can create a major problem when working with white, translucent quartz.
SEAMS:
• Seam tolerance is generally the same for all hard-surface countertop material. The recommended seam width is 1/16″; recommended seam tolerance is +/- 1/32″ Both pieces should be level across a seam, with a tolerance of +/-1/32″. One side of a seam can be slightly raised, or one side can be slightly lowered, but not both.
• The two edges to be seamed must be cut straight and true. If a water jet is used for cutting, the edges should be ground flat to remove any grooves from the cutting process.
• Test fit to make sure that the two pieces to be seamed together form a tight, level, and uniform seam before applying adhesive. Shim and level
pieces if required. Also, check to make sure the color and vein pattern matches across the seam.
• Always clean the joined edges with denatured alcohol and wipe clean with a white cloth. Apply strips of tape to the top and underside of the two pieces to be pined/seamed. Put tape on each side of the two pieces, leaving about 1/4″ between the pieces. This prevents adhesive from dripping into the cabinets and allows for easy clean-up on the top surface.
Tip:
If possible, use a pneumatic seam setter with a vacuum and posts/pins to level and to make seams as tight and inconspicuous as possible. Several manufacturers sell this equipment Seams should never be more than1/6″ wide.
SINKS:
We recommend that the sink manufacturer’s guidelines be followed when installing all sinks, whether they are top mount or undermount.
• We recommend that all sink installations be fully structurally supported without reliance on the Quartz as a form of support.
• Under no conditions can mechanical fasteners (screws, nails, etc.) be affixed directly to Quartz. These items will rust with moisture and the rust will bleed through the stone.
• For under mount sink installations, follow the minimum edge profile recommendations around the cutout to prevent chipping. Fasteners or clips should be used along with silicone.
• All sinks must be sealed to the countertop using 100 percent silicone.
• Always follow the sink manufacturer’s recommendations. Some sinks may require support systems like cradles, rail systems and sink setters.
INSTALLATION OF BACKSPLASH MATERIALS:
• A backsplash is typically 3″ in height unless a full backsplash is desired. The backsplash should always be cut from the same lot or batchas the counter-top material.
• Cut all backsplash material to the sizes required for the project. The top edge and any exposed ends should be polished generally; the backsplash has a flat top with a slightly beveled edge.
• Dry-fit the backsplash to make sure that all Joints and edges are tight. Apply a continuous 1/8″ bead of silicone to the bottom of the backsplash that will be adhered to the countertop surface. Then place dabs of 100-percent silicone every 4-6″ on the back, unpolished side of the stone and adhere it to the wall.
• Do not hard-seam backsplash to countertop.
CARE & MAINTENANCE:
Quartz requires little maintenance to keep the surface looking its best. It is a non-porous material, therefore cleaning with a damp cloth and warm clear water, and mild soap, if desired, is all that is required.
The pH activity level is what determines the best maintenance cleaner for Quartz. For example, most neutral cleaners have a pH balance of 7; however, some neutral cleaners are stronger than others because they have higher pH activity Levels. Some neutral cleaners are not active enough to thoroughly clean the quartz/stone surface, while some neutral cleaners are too active for the quartz/stone.
For routine cleaning, simply wipe down your surface with a damp cloth or paper towel and a pH neutral cleaner for natural stone.
The chart below provides the range of available cleaners and their respective pH Levels. The cleaners that work best to clean Quartz should always have a pH Level of 7-6 for safe, effective, and streak-free cleaning.
ACTIONS TO AVOID:
If any of the substances mentioned below come into contact with your Quartz, rinse the exposed surface immediately and thoroughly with water.
Do not expose, in use or otherwise, Quartz to abrasive or strong alkaline or acid or free radicals or oxidizers or the like (whether high, neutral, or low pH) cleaners. Various chemicals are corrosive and/or erosive in their ability to attack any structure including Quartz. Be very aware of these potential damages to your surface, especially paint removers or furniture strippers containing trichloroethane or methylene chloride.
Do not expose Quartz to acetone as it will leave a film on the countertop surface. We recommend using denatured alcohol if needed. Acetone is harmful to resins and should never be used as a cleaner.
Do not expose Quartz to products including, but not limited to, bleach, oven cleaners, Comet®, Soft Scrub® with Bleach Cleanser, SOS®, products with pumice, batteries, paint removers, furniture strippers, tarnish or silver cleaners, or the Like. Do not use abrasive or harsh scrub pads. Do not apply any sealers, penetrants, or topical treatments to Quartz under any circumstances. Such products will wear off and cause the gloss to appear dull or inconsistent.
ADDITIONAL CONSIDERATIONS
Quartz is made with pure natural quartz. Variation in the natural stone color pattern, size, shape, and shade are inherent and unique characteristics to be expected with this product. This does not affect the material performance in any manner.
Color blotches are intended and designed into many designs to enhance the natural beauty. Samples are small select cuts from a slab; they do not exhibit all the characteristics of a design and therefore are not fully representative of what will be installed. Product will not be replaced due to these variations.
Quartz is durable and more resistant to surface damage than other stone. However, all stone can be damaged by force and no material is chip-proof. Objects hitting edges, particularly at sinks or dishwashers, may generate chips. Though a minor knife slip will dull the knife and not harm Quartz, no stone surface is scratch proof. Surface markings are more visible on monotone designs than multi-colored surfaces.
To prevent heat damage, do not place hot skillets or roasting pans directly onto the surface. We recommend the use of trivets and hot pads. Quartz is not a seamless product; seams are visible. Where there are seams, the product pattern and shade can change.
Quartz does not require any waxes or sealants because it is a non-porous surface. It retains its Lustrous gloss and smooth surface without the need for polish or sealant.