Search


Search
Quartz HD
Fabrication & Installation Guide
FABRICATION GUIDE: COMPLETE INSPECTION OF PRODUCT
VISUAL INSPECTION OF SLABS:
A visual inspection for defects and color matching is essential when working with Valiant Tech EcoPress Quartz. This should be made standard practice before cutting any material.
Complete the following steps to visually inspectslabs for defects:
- Do not inspect slabs with the protective film on.
- Inspect both the front and the back of slabs for any defects.
- Look for any hairline cracks in the slab.
- ALL slabs should be checked for accurate color matching before fabrication, whether the layout calls for them to be seamed or unseamed.
- Check slabs for correct dimensions, warpage, irregular spots, or other defects that make the slab unacceptable for fabrication.
- Check for accurate color matching of all Valiant Quartz colors, and the orientation/layout of pattern flow.
Please note: Once the fabricator has deemed a slab to be acceptable for fabrication and the slab is cut or machined in any way, the slab cannot be exchanged. The fabricator is responsible for determining if the slabs are fit for fabrication. If they are not, they should be exchanged with their supplier. Valiant Tech EcoPress Quartz will not accept claims for any of the above once the slab is modified or fabricated in any way.
FABRICATION GUIDE: COMPLETE INSPECTION OF PRODUCT
VISUAL INSPECTION OF SLABS:
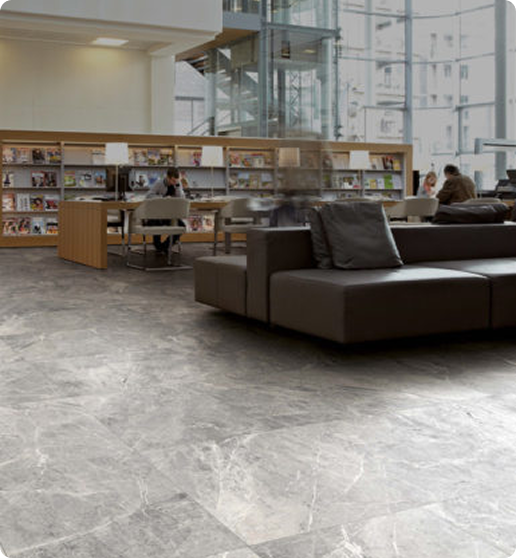
Always inspect all material before fabrication. Valiant Tech EcoPress Quartz replicates marble and is a veined material that has a non-directional pattern. During the layout process it is very important to use extra care in layout relative to your seam locations. Valiant Tech EcoPress Quartz vein distribution can be different throughout the slabs and at all edges, whether factory or fabricated. Our veined patterns will require a somewhat more careful/specialized layout to produce the optimal esthetic look.
Color-matching slabs before fabricating is a very important step. It is typical and expected for Eco press slabs to exhibit slight color variation between batches and/or production cycles, due to the complex blending of natural minerals and raw materials.
If your job requires more than one slab you will want to check the Valiant Tech EcoPress Quartz labels to check batch number along with the shade number of each slab. After inspecting all slab numbers, it is important to remove the protective plastic film. Now you will want to visually inspect slabs for color variation, color match and any other defects before cutting material.
During layout don’t forget to consider backsplashes. It is important that they color match and have vein patterns similar to those on the counter top.
Layout is one of the most important processes in fabricating Valiant Tech EcoPress Quartz and vital to ensuring the best end result. Because Valiant Tech EcoPress Quartz closely replicates the look of natural marble, it requires a little additional attention in this process to maximize the homeowner’s lasting enjoyment.
FABRICATION GUIDE: COMPLETE INSPECTION OF PRODUCT
BOOK MATCH STANDARD: 4 EDGES BOOK MATCHED
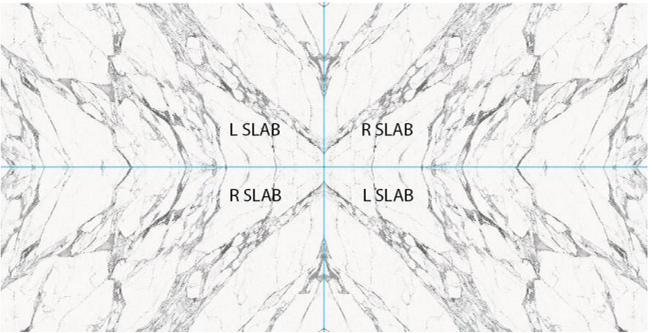
STANDARD OF BOOK MATCHING
In any batch, no less than 70% of slabs will be bookmatched. For the remaining 30% that may not be bookmatched, it is acceptable that the quantity of L slabs and R slabs may not be equal.
FABRICATION GUIDE: COMPLETE INSPECTION OF PRODUCT
WAYS OF PACKING VALIANT TECH ECOPRESS QUARTZ SLABS
Standard Valiant Tech EcoPress Quartz Label on Front of Slabs.
WAYS TO PACK THE SLABS IN BUNDLES
Slabs of book matched left-hand and right-hand design slabs are packed together in the same bundles. Book matched labels will be put on the edge of slabs. Please use the book matched slabs with the same book matched labels.
Slabs of non book matched but with same shade of left-hand and right-hand designs are packed in the same bundles.
For orders of 30 slabs or more, there will be at most 3 separate shades. If the number of shades exceeds 3, then customers approval will be sought before shipping.
FABRICATION GUIDE: RECOMMENDATIONS FOR SLAB STORAGE IN FABRICATION SHOPS
A-FRAMES:
The best way to store Valiant Tech EcoPress Quartz slabs that are ready for fabrication or to be shipped to a job site is on an A-frame that is constructed of wood or metal. It is best that A-frame carts come with forklift receivers for loading and transportation.
- Double A-frames should have the same number of slabs on each side for proper balance and safety.
- Large double A-frame carts are usually 8′ long by 43″ wide with a load height of 60″. The manufacturer-recommended capacity for large double A-frames is 4,4000 lbs (2,200 lbs per side).
- Small double A-frame carts are usually 6′ long by 43″ wide with a load height of 48″. The manufacturer-recommended capacity for small double A-frames is 4,400 lbs (2,200 lbs per side).
- Single-sided A-frames can also be used (these are great for box vans). The manufacturer recommended capacity for single-sided A-frames is 2,200 lbs. Make sure that material is always strapped to an A-frame
- For double A-frames when more than one slab is stored on each side, slabs should be kept flat without any gaps to prevent warping Make sure to strap slabs to the A-frame to prevent warping or flexing.
- Slabs should always be placed face to face and/or back to back to help prevent damage to the polished side of the slab.
- Valiant Tech EcoPress Quartz should always be safely secured to an A-frame with straps whenever trans- ported. Never attempt to move Valiant Tech EcoPress Quartz on an A-frame if material is not banded or strapped. This applies to transportation in the fabrication shops and to transportation on trucks/- vans.
- A-frames are acceptable for temporary storage but never for long-term storage.
FABRICATION GUIDE: RECOMMENDATIONS FOR SLAB STORAGE IN FABRICATION SHOPS
VERTICAL STORAGE RACKS FOR SLABS:
Verticalstorage racks are recommended when slabs require long-term storage to ensure the safety and reliability of the material. Vertical storage racks should be capacity rated, constructed of steel, and designed for Valiant Tech EcoPress Quartz slab storage.
- Slab storage rack system generally come in 5’and 10′ sections with 2″ by 2″ uprights (poles). Rubber-tipped uprights are also recommended. Some of these racking systems can be purchased as interlocking sets.
- Racks that are 5′ usually come with eight (8) square uprights. The capacity varies based on the manufacturer, but a good rule of thumb for this racking system is for internally reinforced uprights (poles) to accommodate 6,800-9,000 lbs between the uprights (sets of poles), and to accommodate a 3,200 – 4,400 lbs load on each upright
- Racks that are 10′ usually come with 16 square uprights The capacity varies based on the manufacturer, but a good rule of thumb for this racking system is for internally reinforced uprights (poles) to accommodate 23,700 lbs between the uprights or ( sets of poles), and to accommodate an 11,800 lbs load on each upright
- Keep in mind the weights or loads on the racking systems can vary by manufacturer. The numbers usedin this fabrication guide are based on heavy-duty racking systems that provide high standards of safety.
- Slabs should always be placed face to face and/or back to back to prevent damage to the polished side of the slab.
- All slabs stored on these long-term storage racks should be covered with Valiant Quartz protective plastic to avoid damage.
- The vertical slab storage racking system is for long-term storage of Valiant Tech EcoPress Quartz.
FABRICATION GUIDE: RECOMMENDED FABRICATION EQUIPMENT & BASIC SAFETY EQUIPMENT
PROPER MATERIAL HANDLING OF VALIANT TECH ECOPRESS QUARTZ
- Never transport Valiant Tech EcoPress Quartz horizontally.
- Horizontalstorage of Valiant Tech EcoPress Quartz adds stress to the material and causes hairline cracks that could lead to breakage.
- Heavy-duty carts/dollies should be used when moving material around your fabrication shop.
- Heavy-duty slab booms and slab-carry clamps should be used to move material around your shop when using an overhead crane or fork truck.
- All cutouts should be supported with 2″ x 4″ x 8″ support rails when being transported for installation.
- Pneumatic vacuum suction cups can also be used to move slabs and finished material throughout the fabrication shop.
- We recommend that all suction cups be used with white rubber to prevent dark rings from appearing on the white translucent Ecopress
The following tools are a minimum requirement for a professional fabricator to have on hand to fabricate Valiant Tech EcoPress Quartz. These tools can be purchased from a variety of suppliers in the United States.
BASIC DIAMOND TOOLING & ASSOCIATED POWER TOOLS:
- Diamond polishing pads (wet pads only). Preferred grits for fabrication are 50, 100, 200, 400, 800, 1500, 3000.
- Diamond Polishing Pads (Honed Finish). Preferred grits for fabrication are 100, 200, 400, 600.
- Diamond cup wheels
- Diamond core bits
- Diamond contour blades (manual sink cutouts)
- Diamond turbo Ecopress blades (5” and 6”sizes)
- Diamond router bits (edge detail)
- Diamond bridge saw blades (Size will vary based on the horsepower of your bridge saw)
- Back-up pads, rigid and flexible (holder for polishing pads with 5/8-11 threads for polisher and grinder)
- Pneumatic polisher (0-4000 rpm)
- Electric grinder/polisher (variable speed of 2,800-11,000 rpm preferred)
- Water supply units for grinder and polisher if not supplied with unit.
FABRICATIONGUIDE: RECOMMENDEDFABRICATION EQUIPMENT & BASIC SAFETY EQUIPMENT
ADDITIONAL RECOMMENDED FABRICATION EQUIPMENT:
- Bridge saw with horsepower of 20 or higher
- Automatic edge profiler
- Computer numerical control (CNC) machine
- Waterjet
- Handheld edge profiling machine
- Fork truck
- Overhead crane
- Fabrication tables
- Air compressor
- Water supply source
- Stone carts/dollies
- A-frames/storage racks
- Slab clamps
BASIC SAFETY EQUIPMENT:
Valiant Tech EcoPress Quartz dust contains silica, which can be a serious health hazard if inhaled.
Valiant Tech EcoPress Quartz should always be cut and polished with wet diamond tooling and proper ventilation throughout the shop and offices. Fabricatorshould always use approved dust masks, and eye, ear and foot protection when fabricating Valiant Tech EcoPress Quartz.
The following list are basic safety equipment options.
- Safety first-aid kit
- Dust masks (indoor and silica rated)
- Safety glasses
- Solvent-resistant gloves
- Ear plugs
- Waterproof, steel-toed boots
- Leather gloves (recommended for moving sharp slabs)
- Ground Fault Interrupter (GFI) for electric tools in a wet environment
FABRICATIONGUIDE: RECOMMENDEDFABRICATION EQUIPMENT & BASIC SAFETY EQUIPMENT
STANDARD SAFETY PRACTICES AND PROCEDURES FOR FABRICATORS
- Always wear protective clothing. Serious injury can occur if safety precautions are not followed in the fabrication shop or on the job site.
- Fabricators should follow all safety instructions and warnings on all material safety data sheets (MSDS) for all products used in the shop.
- Read and follow all manufacturers safety guidelines for all power tools and fabrication equipment used in the shop.
- It is recommended that steel-toed safety boots be worn during the fabrication process, when handling or moving Eco press products, and during installation at a job site.
- Fabricators should always use eye protection. All fabricators should use Occupational Safety and Health Administration (OSHA)-approved eye protection. Failure to use eye protection can result in serious injury
- Fabricators should always use hearing protection when working with machinery and power tools. OSHA limits safe sound exposure to 85 decibels during an eight-hour period. Check with the manufacturers of all your equipment and power tools and adjust hearing protection accordingly. There are outside companies that can test the noise levels in your fabrication shop and suggest proper ear protection.
- Because Valiant Tech EcoPress Quartz recommends that our material be fabricated when wet, fabrication can create the potential for slip hazards. Floors should be sloped to trench drains, and all water should be drained away from the work area. Additionally:
- All trench drains should be cleaned regularly of stone slurry to ensure good drainage for water flow.
- Work area floor should be squeegeed several times a day to eliminate standing water.
- Fabricators using electrical tools should make sure they are using a ground fault interceptor (GFI) and keep away from standing water. Fabrication shops should invest in cord drops from the ceiling as an electrical solution.
- Pneumatic tools (those powered by compressed air) are always recommended.
- Check your state’s OSHA guidelines to better understand all proper safety protocol.
FABRICATION GUIDE: TEMPLATING:JOB LAYOUT & MEASUREMENT
DIGITAL TEMPLATING:
Today there are many digital templating methods from which to choose. Digital templating is used to capture accurate countertop dimensions and configuration data. Digital templating has the advantage of being able to send/relay the digital information directly to compatible fabrication equipment, such as computer numerical control (CNC) machines, bridge saws and water jets. These digital systems use lasers, digital cameras and point-to-point digitizers. Digital templating technology is a faster, more accurate and efficient way to measure jobs because information can be transferred digitally to your fabrication equipment.
MANUAL TEMPLATING:
Handmade fabrication templates are created to accurately transfer the measurements and configurations from the job site to the fabrication shop. The most common items used are thin plywood, luan strips and cardboard. Job drawings containing the specific job information are very important to support the actual template.
It is important to capture all necessary information to accurately fabricate all aspects of the job, including sink and appliance center lines, faucet hole locations, finished edges and overhangs. It is recommended that all appliances, sinks, cooktops, or any item that requires a cutout on the countertop be on site when the job is templated.
INFORMATION TO GATHER FROM HOMEOWNER:
- Choice 2cm material
- Name of Valiant Tech EcoPress Quartz slab selection
- Determine seam locations if needed
- Edge profile
- Back splash
- Sink location
- Faucet location
- Appliance locations(i.e. cooktop/range, refrigerator, dishwasher)
- Location of additional items (i.e. soap dispenser,sprayer)
- Clarify inside corners (in order to get a 3/8” minimum, fabricators have to use a ¾” core bit. Valiant Tech EcoPress Quartz is requiring corners to have a 3/8” minimum.)
Very important regarding cabinets:
Make sure that the cabinets are finished and installed properly. Fabricator must verify that all cabinets are level. The top of the cabinets must be true and flat with no more than a 1/16”slope over the span of 18”. The cabinets must be adjoined to each other and secured to the immediate wall. All cutouts and seams must be properly supported; similarly, there should be extra, structural support around the dishwasher.
FABRICATION GUIDE: TEMPLATING:JOB LAYOUT & MEASUREMENT
ADDITIONAL SUPPORT REQUIREMENTS:
Structures with support on four (4)sides. Structures supported on four sides do not require any additional support for 2cm material if the countertop depth is less than 26” and the countertop length is less than 118”.
However, if the above dimensions are exceeded, support will be required every 36”.
Structures with support on three (3)sides (i.e. dishwashers, frameless cabinets, desks, and Lazy Susans). Structures supported on three sides require additional support for 2cm material as follows:
- 2cm material needs support every 24”
FABRICATION GUIDE: TEMPLATING:JOB LAYOUT & MEASUREMENT
OVERHANG/CANTILEVER REQUIREMENTS:
- Overhangs cannot exceed 1/3 of the countertop depth and must have a minimum length of 24”.
- Material that is 2cm requires support every 24”.
- Over hang ratios require that two-thirds of the width/length of the material to be used be supported; one-third of the width/length of the material to be used can be unsupported (an overhang).
- No cutouts or cored holes are permitted on any overhangs
- Additional support (i.e. support bars or 5/8”plywood) may need to be added to meet additional span requirements.
- Overhangs that exceed cantilever rules will need to add columns, corbels or legs to be properly supported as follows:
-
Overhang No Support Needed Corbels Required Columns Required 2cm material ≤ 8” > 8” > 18” - Corbels should always be mounted to a stud for proper support of the material.
RECOMMENDED SUPPORT MATERIAL FOR CABINETS:
- Plywood, wood, medium density fiber board and structural steel are the recommended support materials for cabinets that need additional support for Valiant Tech EcoPress Quartz.
- Materials or products that are not moisture resistant, like oriented strand board and particle board, are not acceptable as support material.
- The above information should be taken into consideration during the templating and layout/measuring process. This will help to prevent any problems during the fabrication and installation process. Not following the procedures in this fabrication guide voids any warranty provided by Valiant Tech EcoPress Quartz.
FABRICATION GUIDE: FABRICATING VALIANT TECH ECOPRESS QUARTZ
1. LAYOUT:
Before cutting Valiant Tech EcoPress Quartz slabs, calculate the square footage, length, and width of material that will be needed to complete the project. This very important when using Valiant Tech EcoPress Quartz because each batch and slab are unique and have specific shades that need to be used for each job. Inaccurate measurements may create color match concerns and more material may need to be ordered. It is important to thoroughly inspect the slab for color, pattern and defects. Do not use material with visible manufacturing defects unless the layout/job allows you to work around them.
2. DETERMINE SEAM LOCATIONS:
During the layout process, determine all your seam locations. This is very important to ensure the optimum aesthetics of the material and the kitchen. Seams should never be placed in the following locations:
- Through the center of sink cutout.
- In places where there is direct sunlight.
- Above dishwashers
3. PROPER VEINING/COLOR MATCHING:
- Always inspect all material before fabrication. Valiant Tech EcoPress Quartz replicates marble as it is a veined material that has a non-directional pattern. During the layout process, it is very important to use extra care with respect to your seam locations. Whether the material has a factory edge or a fabricated edge, the Valiant Tech EcoPress Quartz vein distribution can be different throughout the slabs. Our veined patterns will require a more careful/specialized layout to provide the customer with a rich, aesthetic look.
- Color matching slabs before fabrication is very important as it is very normal for Valiant Tech EcoPress Quartz slabs to have slight color variations between batches production cycles due to the complex blending of natural minerals and raw materials.
- If your job requires more than one slab, be sure to check the Valiant Tech EcoPress Quartz label for the batch number and the shade number of the slabs. After inspecting all slab numbers, it is important to remove the protective plastic film to visually inspect slabs for color variation, color matching, and any defects before cutting material.
- During the layout process, remember to color match backsplashes as they must color match and have a similar vein pattern to the countertop.
- The layout process is a critical one in the fabrication of Valiant Tech EcoPress Quartz as it directly impacts the beauty of the final product that is produced. A little extra attention during the layout process really showcases the beauty of Valiant Tech EcoPress Quartz and can create endless beauty for the homeowner.
4. PROPER CUTTING:
- All equipment that is used to cut Valiant Tech EcoPress Quartz should always be kept cool with a sufficient amount of water.
ALWAYS AVOID EXCESSIVE HEAT WITH ALL DIAMOND-CUTTING TOOLS.
- The first cut of your Valiant Tech EcoPress Quartz slab should be made along the largest part of the slab and then proceed to the shortest.
- When using a bridge saw, never plunge cut.
-
Important: Never cut inside square corners when fabricating Valiant Tech EcoPress Quartz. This can create stress points in the countertop and can result in cracking.
ALWAYS USE A DIAMOND CORE BIT FOR ALL CORNERS OR RADIUSES. - Inside corners that are fabricated on a single slab must have a minimum of a 3/8” radius.
- Cross cutting a slab is strongly prohibited when following the cut sequence. Cross cutting will create vibrations and tension thus a crack could occur. Finish all cuts completely while using the recommended cut sequence. Always use a diamond core bit to create a radius . Please clarify: This should always be used on inside corners , so any internal angled corner must have a radius. NEVER CROSS CUT!
- Remember that Valiant Tech EcoPress Quartz slabs contain resin, which can cause warping or bowing depending on the weather and how they are stored. If bowing or warping does exist in the slab, cutting the slab into component parts will release the tension and flatten out the pieces.
5. CUTOUTS:
This can be completed with several different types of equipment. A bridge saw can be used for straight cuts, but a radius needs to be cored with diamond core bits with no cross cutting. The same rules apply to CNC machines, which are also very popular. A waterjet can also be used with the proper abrasives and water pressure.
- L- or U-shaped countertops with inside corners should always be fabricated from a single slab and must have a minimum of a 3/8” radius. Always keep in mind that the larger the radius, the stronger the corner.
- If the distance between the cutout and the seam is less than 6”, the seam needs to be supported. This can be achieved during the layout process by making sure that all seams are at a cross member of the base cabinet; otherwise, additional cross members need to be added.
- Internal cutouts on all inside corners should have a 3/8” radius at minimum.
- Cutouts for all drop-in sinks, cooktops, outlets, slide-in stoves, etc. should include an extra 1/8” from the edge to allow for expansion.
- Cutouts range from simple, core holes for faucets and soap dispensers to complex cutouts for specialized equipment. It is best to have all equipment on the job site during the installation process as this is the safest way to determine the shape and size of the core or cutout.
- Always refer to the manufacturer’s recommendations when available.
- The customer should make the final decision regarding the location and the size of the cutout in their countertop and sign off on this.
- Additional support should be added to both ends of the cutout if the base cabinet cross bars are not within 3” of cutout.
- All hot cutouts (i.e. cooktops) require that 9-mil aluminum foil tape (heat tape) be used to prevent the transfer of heat to Valiant Tech EcoPress Quartz. Always follow manufacturer’s guidelines.
6. LAMINATIONS:
When laminating, it is important to make sure that the lamination piece is the full length of the top piece and that the corners are cut at 45 degrees. If for some reason the two laminated pieces must be joined, the joint must be cut at a 45-degree angle. The use of a mitered end cut reduces stress on the material that may cause stress fractures.
The lamination strip should be cut from the same slab as the countertop surface material to ensure a color match. When cutting the piece to be laminated, add the lamination piece size to your cutting measurements to ensure that a lamination strip of the correct length and color is available for the lamination process. A 45-degree corner joint is recommended to minimize the stress on the corners.
• Use full-length lamination pieces if possible.
• For long countertop runs where a joint may be required, make sure that the joint in the laminated piece is at 45 degrees to minimize stress points.
• When clamping and gluing miter joints, we recommend the use of Mitsubishi G-Tape or a tape of similar properties. For standard 1 ½” mitered edge profiles, tape should be applied prior to glue every 8” to 10”. As edge profiles become taller (3” to 8”) tape will need to be applied more frequently to support the weight of the apron piece being attached. If mechanical clamping systems or jigs are being used to secure the miter during the gluing process, be aware that both uneven clamp pressure, or clamp pressure higher than required can introduce warpage into the finished product.
Mitered Edge:
A mitered edge is one with a perfect, 90-degree angle. This is created by joining two pieces of Valiant Tech EcoPress Quartz, each with a 45-degree angle. This is typically done with 2cm material. The longer the apron, the harder it is to hide the seams because it is more difficult to clamp. It is never recommended to have a mitered edge over 4” unless a special support is added.
Adhesives:
We recommend that a cartridge-style acrylic or epoxy that is already color matched for Valiant Tech EcoPress Quartz be used. Valiant Tech EcoPress Quartz is translucent, so solid colors will not match the translucen- cy of the stone. Acrylics and epoxies have a chemical attraction to the stone and will provide the tightest seams. This is very important for mitered edge details because, when properly done, the adhesive is not visible.
7. POLISHING/EDGE DETAIL:
Polishing: It is very important to select the right polishing pads for Valiant Tech EcoPress Quartz. Please note: Do not use polishing pads that have colored resin. While such pads can work well with granite, they require an excessive amount of water and can transfer the resin’s color to the edges of Valiant Tech EcoPress Quartz. We recommend using only white resin pads for all applications, whether hand polishing, or using an automatic edge polisher or a CNC machine.
1. Rigid Backer Pads: Flexible backers work well for concave profile edges, such as ogee edges. The need to use a flexible backer on most other profiles is not needed. Keep in mind automatic edge machines all use extremely rigid polishing tools and backer pads; these machines will produce a far better edge than what many fabricators can do by hand.
2. Polishing Pads: Common problems include both using too much water and not enough water, and not using the proper polishing technique. The Sequence of grits shown above for both Polished and Hone finishes are a guideline for achieving a polish equal to the factory finish.
• When too much water is used while applying pressure to the center of the pad, the water gets trapped in between the pad and the stone, causing a hydroplaning effect. This causes the water to escape to the outer edges of the pad, making it difficult for the polishing pad to effectively polish the edge or edge’s surface. This will result in a spotty polish.
• When too little water is used, the polishing pads tend to flex or cup outwards around the center of the pad (mainly with higher grits). This causes the outer edges of the polishing pad to touch the surface but will not allow the center of pad to polish. The tendency is to apply more pressure, which also leaves a spotty polish.
• Never use a final buffing pad for Valiant Tech EcoPress Quartz. These come in black and buff and contain different chemicals and no diamonds and are meant to bring granite to a high polish. The final step for polishing Valiant Tech EcoPress Quartz is to use a grit level of 3000.
• Dry polishing the edge profile may cause overheating of Valiant Tech EcoPress Quartz. Excessive heat to the stone can alter the physical properties of the slab which can cause micro-fissures not visible to the naked eye. This can lead to chipping, discoloration and a poor, uneven polish. Never use dry polishing pads on Valiant Tech EcoPress Quartz.
When polishing the top edge of the miter after gluing has been completed, we recommend the following steps;
1. Begin the process with a 400 polishing pad applying very light pressure on the tool. Repeat this process with a 600 polishing pad, again applying very light pressure on the tool. Fabricators who routinely work with porcelain or sintered stone products typically must exert a much higher degree of pressure on the tool due to the extreme hardness of the materials they are polishing. If this process is adhered to, the visible line that appears at the transition from the top surface to edge in Valiant Tech EcoPress Quartz will be much less visible than the typical result you would see in either a porcelain or sintered stone slab.
• Valiant Tech EcoPress Quartz should never be polished on the top surface of the manufacturing finish.
Polishing Tips: When polishing any edge detail on Valiant Tech EcoPress Quartz you should use the proper amount of water. Polishing pads with grit levels of 50-400 have a higher concentration of diamonds and require less water; a trickle from your center water feed will be sufficient. Higher 800-1,500 grit pads have less diamond content and require more water. Using the proper water flow allows the pads to work faster.
Polishing should be done in circular motion, utilizing the edges of the polishing pad as it rotates from the top half of the edge to the bottom half as it moves down the piece. While polishing, you will feel resistance with each grit level, which is the diamonds polishing. Allowing the diamonds to do the work requires less pressure from the polisher. When resistance is no longer felt, it is time to change the polishing pad to the next grit. Follow this procedure until you arrive at the final grit level.
2. Air/Electric Polisher RPM: The rpm for all air/electric polishers should be between 2,800-4,000. It is best to start at 2,800 rpm and increase as needed. Anything over 4,000 rpm could result in burning or smearing the resin on your edge detail. This is where the color of the resin on the polishing pad makes a big difference. If the edge is burned with a white resin polishing pad, it can be easily removed with denatured alcohol. However, the dye in colored resin polishing pads can create a major problem when working with white, translucent Ecopress.
INSTALLATION:
It is important that cabinets are leveled, and shimmed where necessary, to 1/16” tolerances prior to final countertop installation. Check all cabinets for level.
• After the support system is installed and leveled, installation of the Valiant Tech EcoPress Quartz countertops can begin. Measure cabinets and verify that the pieces will fit before placing the Valiant Tech EcoPress Quartz on the countertop.
• Bring the pieces in one at a time, and test fit them in their proper place on the cabinets. Adjust as necessary to ensure a good fit and proper alignment. Always make any necessary cuts outside, cutting wet to control dust.
• Space should always be allowed as Valiant Tech EcoPress Quartz needs room to expand. Each countertop requires at least 1/8” at each wall for expansion and contraction. Fill the gap between the wall and countertop with silicone.
• After all of the pieces have been adjusted for fit, you will need to attach the tops to the cabinets and support strips using caulk that is 100 percent silicone. Apply silicone caulk approximately every 8”-12” around the perimeter of the cabinet, and at the cross supports. Do not use epoxy adhesive, acrylic adhesive or the product Liquid Nails. The purpose of the silicone is to allow the top to expand and contract as needed.
• Use extra silicone on all corners and joints, and around all cutouts.
SEAMS:
• Seam tolerance is generally the same for all hard-surface countertop material. The recommended seam width is 1/16”; recommended seam tolerance is +/- 1/32”. Both pieces should be level across a seam, with a tolerance of +/- 1/32”. One side of a seam can be slightly raised, or one side can be slightly lowered, but not both.
• The two edges to be seamed must be cut straight and true. If a waterjet is used for cutting, the edges should be ground flat to remove any grooves from the cutting process.
• Test fit to make sure that the two pieces to be seamed together form a tight, level and uniform seam before applying adhesive. Shim and level pieces if required. Also, check to make sure the color and vein pattern matches across the seam.
• Always clean the joined edges with denatured alcohol and wipe clean with a white cloth. Apply strips of tape to the top and underside of the two pieces to be joined/seamed. Put tape on each side of the two pieces, leaving about 1/4” between the pieces. This prevents adhesive from dripping into the cabinets and allows for easy clean-up on the top surface.
Tip:
If possible, use a pneumatic seam setter with a vacuum and posts/pins to level and to make seams as tight and inconspicuous as possible. Several manufacturers sell this equipment. Seams should never be more than 1/16” wide.
ADHESIVE:
• Seams should be made using a pre-mixed cartridge adhesive, which can be either acrylic or a two-part epoxy system.
• Insert the adhesive cartridge in the seaming gun with a fresh, disposable mixing tip. Always purge the adhesive (generally the length of the tip you are using) with your cartridge adhesive system to ensure that the adhesive and hardener is properly mixed before seaming the material. After each use, remove and replace the tip, otherwise the remaining adhesive will cure in the tip.
Remove the used tip and replace the original cap for an airtight seal. The normal cure time for acrylics is about 15-20 minutes in 70º F. During the summer month’s hot temperatures, work time is reduced. During winter’s colder tempera- tures, work time is increased. The cure time for two-part epoxy systems can be anywhere from 2-6 hours.
SINKS:
We recommend that the sink manufacturer’s guidelines be followed when installing all sinks, whether they are top mount or undermount.
• We recommend that all sink installations be fully structurally supported without reliance on the Valiant Tech EcoPress Quartz as a form of support.
• Under no conditions can mechanical fasteners (screws, nails, etc.) be affixed directly to Valiant Tech EcoPress Quartz. These items will rust with moisture and the rust will bleed through the stone.
• For under mount sink installations, follow the minimum edge profile recommendations around the cutout to prevent chipping. Fasteners or clips should be used along with silicone.
• All sinks must be sealed to the countertop using 100 percent silicone.
• Always follow the sink manufacturer’s recommendations. Some sinks may require support systems like cradles, rail systems and sink setters.
INSTALLATION OF BACKSPLASH MATERIALS:
• A backsplash is typically 3” in height unless a full backsplash is desired. The backsplash should always be cut from the same lot or batch as the countertop material.
• Cut all backsplash material to the sizes required for the project. The top edge and any exposed ends should be polished. Generally, the backsplash has a flat top with a slightly beveled edge.
• Dry-fit the backsplash to make sure that all joints and edges are tight. Apply a continuous 1/8” bead of silicone to the bottom of the backsplash that will be adhered to the countertop surface. Then place dabs of 100-percent silicone every 4”-6” on the back, unpolished side of the stone and adhere it to the wall.
• Do not hard-seam backsplash to countertop.
WALL APPLICATIONS (VERTICAL):
Valiant Tech EcoPress Quartz can be used for all internal cladding of walls and vertical applications. The installation of vertical panels varies from location to location. Check with your local building codes. When designing and installing vertical panels and cladding, it is necessary to take the weight of the product into account and the services of an experienced structural engineer should be sought during the designing and installation phases.
Installation Guide
1. Measure for any cutouts required on the water line wall of the shower. This is the wall with the Tub Diverter, Bathtub Faucet and the Shower head. Use a tape measure to determine where you need to cut holes in the Valiant Tech EcoPress Quartz slab for the pipe cut-outs. Mark the slab and use the diamond core bit to cut out the necessary holes. Allow a ½” clearance around all pipe cutouts.
2. Install the front and back slabs first before you install the side pieces. Apply a setting epoxy adhesive to the back of the slab that you are adhering to the wall. Use a ¼” notched trowel to spread the setting epoxy onto the back of the slab. This may require more than one person for the heavier/larger slabs. Maneuver the slab into position. Place it firmly against the following substrates, Cement board, Waterproofed plywood or existing Backer board on the walls. (if using existing backer board make sure it is free of any defects)
3. Apply firm pressure and move the slab up and down and side to side as much as you can to force the epoxy glue to completely bond with the wall/substrate behind and the slab itself. Once finished, allow the slab to come to its final resting place on top of the shower pan. Provide a minimum of 1/8” expansion joint (to be caulked with 100% silicone) at the bottom/top of the slabs, which would be the shower pan and ceiling. Use 1/8” shims at the top and bottom of slabs to get the proper spacing for expansion joints. Repeat the process with all other wall panels that are needed to finish the wall surround.
4. Epoxy or “hard” seams are not recommended for vertical wall applications. All corners should be caulked with 100% silicone caulk. Allow 1/8” minimum expansion joint between adjacent Valiant Tech EcoPress Quartz slabs. Use 1/8” shims between the adjacent slabs to get the proper spacing for expansion joints.
5. Apply the proper braces to support the wall panel until setting epoxy adhesive is completely cured. Keep the braces in place for at least 24 hours or according to the drying time on your setting epoxy adhesive.
6. Remove the braces. Apply silicone caulking to the inside corners and fill the gaps between the slabs. Also, silicone the area where the slabs meet the shower pan and ceiling. Allow the caulking to dry for 72 hours before using the shower.